Body Position At Extension
There are a number of ways to enter the water and then set up for the next pull. A swimmer may or may not fully extend their arm, and body rotation will vary greatly. The KEY POINT is that every great swimmer moves to the position that creates the least frontal resistance, and best sets up their next stroke, allowing them to apply force in the most useful way. What we’ll look at here is a good STARTING POINT for most people in that it describes an EASILY REPEATABLE method for training your body to move to the same position every stroke.

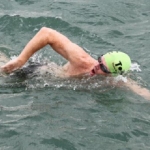
Michael Phelps, Natalie Coughlin (right), Lindsey Benko (bottom), shown during completely different strokes.
Who’s swimming full stroke? (Phelps, Coughlin)
Who’s doing a drill? (Benko, single-arm)
Who’s changing speeds? (Coughlin, two different swim segments)
It’s almost impossible to tell. Even down to the position of their fingers feeling the water, their side lying positions are virtually IDENTICAL (to every other stroke THEY take, NOT identical to other swimmers). They have trained to “LAND” in the SAME position every stroke. They are fully extended, eyes down, head tight to the shoulder, palm down. (And if you check Phelps’ and Benko’s hips, you can see that the lower leg is raised straight up to the surface, just like in my “2- and 6-Beat Kick Form Drill Sequence” post.)
You’ll also notice varying degrees of hip rotation: Phelps (least), Benko (about 45deg), Coughlin (60deg+).
One thing they all do is set up their extended arm so THEIR ELBOW POINTS OUT TO THE SIDE. Many top coaches mention this necessity in their books and videos. Why do this? You can’t drop your forearm down into an early catch position if it isn’t. The elbow will either be to the side or facing down to some degree. If it’s down, the forearm can only bend up (not useful), drop down straight (poor propulsion), or you can wait for your shoulders to come back around with your recovery so the elbow is finally pointed to the side again (as you wait and slow down). So it’s best just to SET THIS UP IMMEDIATELY as you extend, rotating no more and no less than required.
Here are links to the videos above:
http://www.youtube.com/watch?v=GQ8iw8q2F9U (Natalie – body-based swimmer with hips and shoulders moving together)
http://www.youtube.com/watch?v=U8hO5W5maDg (Lindsey – check out her narrow kick)
http://www.youtube.com/watch?v=kYKBfXM5Ckk (a short clip of Lindsey)
http://www.youtube.com/watch?v=SuRLkXB2IBE (Michael – notice the easy 2-beat kick in the beginning)
Note: all three are gold medalists and current/former world record holders.
How can you practice getting into the same position yourself? One way is to use the crease in the wall. You may feel tension in your hips or shoulders, or feel your low back sway a bit to get everything lined up. These are areas to be stretched and strengthened.

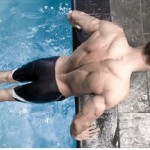
Harry N. of the Brooklyn Triathlon Club was generous enough to allow me to photograph some of his deck work during a recent lesson, where we set up a proper side body position. I like using the floor and walls as guides (inspired by Richard Quick’s ridiculously useful Posture, Line, and Balance teachings). Set yourself up with your wrist bone and elbow against the wall. If your elbow is angled down at all, turn your armpit (and shoulders) down toward the floor until the elbow points out. Everyone has DIFFERENT SHOULDER FLEXIBILITY, and this will determine the amount you will be able to rotate your shoulders in the water. Hip rotation (for some swimmers) is vital, but not at the expense of over-rotating your shoulders and taking your arm out of position.

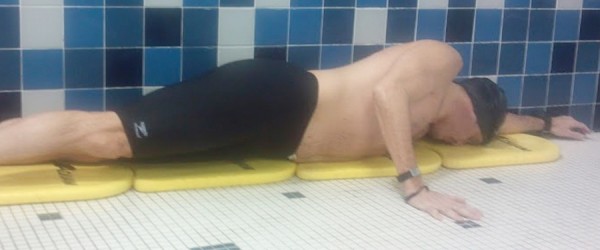
Here’s a side view. With the floor as a guide, he can feel what it’s like to be perfectly flat, legs no lower than his hips when on his side, so the water will slip by.

He lifts his lower leg up, doing his best to keep it straight. This is the position the pro swimmers are in above (and the one we’re looking to permanently imprint with the 2- and 6-Beat Kick Form Drill Sequence). Over time, you’ll notice when you’re NOT in this position and go back and correct it. For most amateurs, the inner thigh and hip must be ACTIVELY ENGAGED at every arm extension to achieve this position (with attention paid so that the other leg doesn’t drop down too low in opposition).
PRACTICE
Note: There are a number of versions of the Side Kick Drill out there, used for position, breathing, balance, etc. The focus I’m suggesting is to set up your stroke the way it will be every time you extend your arm – I call the palm, armpit, and head set-up, the “Platform” – as close to your actual stroke as you can make it.
Here’s a 1 hour workout we did the past two days in swim class, using the drills described below. It is amazing how smooth and powerful I feel after this type of work.
10min – 25 Kick face down with straight legs and pointed toes (arms at sides or overhead)/25 Swim with a low breathing position.
10min – 25 Side Kick Drill with one switch mid-pool to the other side/25 Swim the “rails”.
10min – 25 Side Kick, switch sides every 10 kicks, breathing on the pulling side/25 Swim, counting strokes and reducing them each time via narrower body position.
15min – Swim 100yd at a time with 20sec rest between them – 25 streamlined kick, 25 Side Kick Drill, 25 Side Kick Switch, 25 Swim “Rails”. Repeat three times.
15min – Easy 100s with 20sec rest between each – focus on a perfect side-lying position every time your reach forward.
Side Kick:
Get in the pool right after doing this deck work, do a Side Kick Drill with a continuous kick, holding the position above. The keys are:
1 – Palm, armpit, and eyes are down, arms stationary in the same position as Harry and the pro swimmers, kicking down the pool (the arm at your side is flat to your body). Extended arm is 1-2ft below the surface, depending on shoulder flexibility. In any case, it should not be near the surface as this will cause the hips to drop or the shoulders/hips to flatten out.
2 – Body is rotated up 45-60deg, as far as you can go without disturbing the front body position.
3 – Narrow kick.
4 – Breathe by rolling the head up (and the shoulders a bit as well), then return to the side lying position. Set up the front end and then rotate the body up.
(an example of Side Kicking)
Side Kick – Switch Sides Every 10 Kicks:
Get in the Side Kick position, make ten strong, narrow kicks, then recover the arm from your side, and pull and breathe, switching yourself into the Side Kick position on the other side. Make sure you hold your body angle after the switch – don’t let yourself go flat.
Note: this is a good drill to do at a high effort level
Good breathing tip: the head must not move up/down or side to side during the breath or an important part of the drill will fail. In the Side Kick position, your head is pressed to the shoulder of the extended arm. When switching, keep your head down, and as your recovering arm moves past your head and begins to extend, “glue” your head to that arm as you roll to take your breath. This will keep your head low, rotating as if “on a skewer”. You may drink some water on your early attempts, but stick with it, as this will really smooth out your breathing motion.
Note: see video link after “The Rails”.
Swim “The Rails”:
Now swim full stroke, over the center line of your lane. Use the outside edges of the line as guides.
1 – Keep your gaze firmly over the center of the line and strive to take a breath in a smooth enough fashion that when you turn your head back down, your eyes return to the center without any correction. Use the method from the switching drill above to steady your head and keep it low to the water.
2 – Every stroke, “land” in the Side Kick position (on the left side of the line when extending the left arm, and vice versa) and hold there, stretched out for a brief moment.
This is a video from GoSwim that actually approximates both of the above drills (check them out as they have some great videos of all the strokes). At about the 1min mark, they start their drill, where they kick FIVE times on each side. If you extend this to TEN, you’ve got the Side Kick Switch drill, and if you hold for THREE kicks on a side (a standard 6-beat kick), or even do it as they show, you can work on swimming “The Rails”.
And finally, this video from Go Swim focuses on one of the important points of the side-lying position: keeping the shoulders narrow. Take a look and then refocus your efforts in the drills and swims.